Hello reader! May I ask if you own a GPU from NVIDIA? Or a Nintendo Switch? Maybe an NVIDIA Shield? All of these devices have something in common: a weird piece of hardware that is called the NVIDIA Falcon.
It’s a processor for general-purpose logic controlling that is used across many different devices for different purposes. Normally, this would be no target of interest if some variants of it did not have a hardware-based implementation of AES for cryptographic operations. This functionality is used to restrict access of certain system resources and registers to cryptographically signed microcode.
A bug in the foundation of Nintendo Switch consoles, the Tegra X1, allowed attackers to take control of the system in a very early boot context, completely compromising the integrity of Nintendo’s boot environment (CVE-2018-6242).
Instead of acknowledging defeat, they followed up with a solution involving an aforementioned Falcon device in the console, called the “TSEC”. The solution had the Falcon decrypt and authenticate the bootloader using hardware secrets we didn’t have access to while also making it impossible to return to controlled code after yielding control to the TSEC.
NVIDIA describes this cryptosystem as “Providing secure access to a secret” so let’s take a closer look at how the security of these devices was defeated and what could’ve been done better to secure them properly. In this first part of multiple articles, let’s look at how the previously mentioned TSEC firmware motivated Falcon hacking and how it was defeated.
Homebrew on the Horizon#
In the earlier days of Nintendo Switch hacking, the entrypoints to homebrew were rather rudimentary and only provided a very limited amount of system resources to be used by the developers of these unsigned and unauthorized pieces of code. A custom firmware environment that could patch, bypass or entirely escalate certain components of the Horizon operating system became mandatory to give users and developers more freedom in using the system to its fullest potential. But for this to work, there was a need to obtain certain cryptographic keys used by the system to protect its components.
The entire cryptosystem back then devolved around two console-unique keys which were used in combination with some other keys from the internal storage to derive static keys for everything else: The Secure Boot Key (SBK) set by the bootrom and the TSEC key, generated from the KFUSE private key. By using the hardware-based Falcon cryptography, latter key was derived at boot stage by an authenticated firmware we could not tamper with and was passed back to the Boot CPU through the mutually shared SOR1 registers.
Considering you could run this TSEC firmware and just copy back the key it sets, the interest in messing with a poorly documented processor, its hardware authentication mechanisms and even the code written for the foreign instruction set architecture was no very high and the TSEC was ignored for most part.
Recovering Trust#
After a timeskip, now with Atmosphère being able to coldboot from a flaw in the Tegra X1 bootrom before any Horizon code actually starts, hackers had control over the entire system with nothing Nintendo could do about this….other than gearing up the security from this one piece of hardware that was previously avoided - You guessed it, a Falcon engine named TSEC.
We still depended on the TSEC key and another newly introduced key, the TSEC Root key, so we couldn’t leave any parts of Nintendo’s new TSEC firmware away and had to run it as-is. We couldn’t sign our own firmware either or modify it as it would not generate the same keys then. As soon as we ran the firmware, it would rewrite the exception vectors of the Boot processor, decrypt and calculate a MAC over Nintendo’s bootloader from more unknown hardware secrets, and lastly set the program counter straight to the bootloader which redirects execution back into trusted and verified code.
A mature attempt by Nintendo to secure their system despite having a bootrom vulnerability leading to arbitrary code execution. No excuses anymore, the TSEC needed to be defeated. So let’s approach this firmware and take a closer look at its different stages and how they are used to implement a Secure Boot environment to recover trust in the boot chain.
A First Look at the Firmware#
For the purpose of this post, we’ll be analyzing the 8.1.0 firmware as the previous versions had drastically more attack surface to fault injection and were bypassable by other means, mostly avoiding interaction with the actual firmware.
Anatomy of the Blob#
The TSEC’s firmware is loaded into the code memory (IMEM) by the first bootloader. Said IMEM uses primitive virtual memory/paging in 0x100 byte pages tracked by a reverse page table. When uploading code, it must always be aligned to 0x100 bytes and if a blob doesn’t fit whole pages, it must be padded. Code can tag certain pages as ‘secure’ which causes the hardware to calculate and verify a MAC when landing on such ‘secure’ pages.
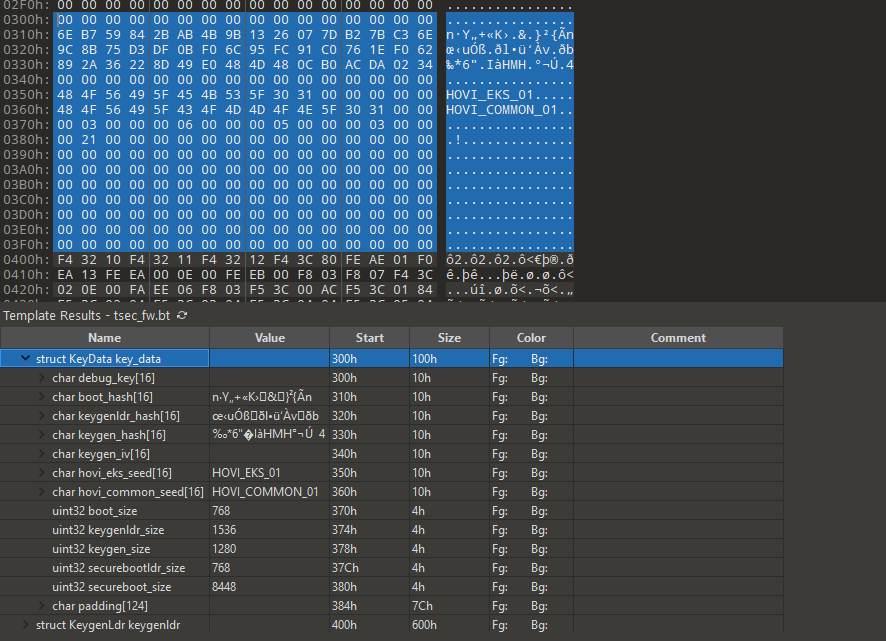
When taking a look at the firmware in a hex editor, we can recognize the patterns of page alignment and identify most of the individual stages. But the firmware does not only consist of code, but also uses one page starting from physical address 0x300 to get the sizes of all blobs, some key derivation seeds and the cryptographic hashes for all signed stages.
Extracting the Stages#
Knowing the sizes of the individual stages from the key data blob, we can build a small script to split everything up.
    (
        boot_size,
        keygenldr_size,
        keygen_size,
        securebootldr_size,
        secureboot_size
    ) = unpack(
         '16s16s16s16s16s16s16sIIIII124x',
         package1_blob[key_blob_data_start:key_blob_data_end]
    )[7:]

    blob_pos = 0
    blob_pos = dump_blob(tsec_dir / 'boot.bin', package1_blob, blob_pos, boot_size)
    blob_pos = dump_blob(tsec_dir / 'key_table.bin', package1_blob, blob_pos, 0x100)
    blob_pos = dump_blob(tsec_dir / 'keygenldr.bin', package1_blob, blob_pos, keygenldr_size)
    blob_pos = dump_blob(tsec_dir / 'keygen.bin', package1_blob, blob_pos, keygen_size)
    blob_pos = dump_blob(tsec_dir / 'secureboot.bin', package1_blob, blob_pos, secureboot_size)
    blob_pos = dump_blob(tsec_dir / 'securebootldr.bin', package1_blob, blob_pos, securebootldr_size)
Back in the days where nobody cared about this, the firmware consisted of Boot 🡒 KeygenLdr 🡒 Keygen. The 6.2.0 update extended it to Boot 🡒 SecureBootLdr 🡒 KeygenLdr 🡒 Keygen 🡒 SecureBoot, but the layout of the original firmware is preserved in the sense that KeygenLdr and Keygen are placed at the same position in memory. We’ll get back to that later but for now we can start to reverse all the firmwares in order. Back in the good old days (actually also quite some time after the Falcon was already defeated), this was done by hand with envydis, the only disassembler we had back then. But with the efforts put into ghidra_falcon since then, the game has changed a bit.
Boot#

After loading the Boot stage into Ghidra, we notice some bootstrap code which sets the stack
pointer to the end of the Falcon DMEM (a space for stack and local variables, completely
separated from code memory IMEM), then jumps to main.
The main function itself is fairly unspectacular too: We have a memcpy which copies the first
0x84 bytes of the key data blob from IMEM to DMEM. Comparing this with what we’ve previously seen
in the hex editor, it sums up the sizes of Boot, KeygenLdr, Keygen and SecureBoot plus 0x100 bytes
for the key data page itself to calculate the entrypoint of the next stage, SecureBootLdr, and then
jumps to it.
This is certainly not what we probably expected from the first stage of a secure firmware, but with all other firmwares hardcoding the key data to the same address (0x300), NVIDIA decided it is easier to move the previous implementation of Boot along with all the new additions and future room for more code to a newly introduced stage, SecureBootLdr, which does not break compatibility with KeygenLdr and Keygen which previously existed already. That being said, we can move on to analyze SecureBootLdr which hopefully contains more information for us.
SecureBootLdr#
At address 0x3000, the start of SecureBootLdr, we’re sent to securebootldr_main which does quite
a lot of stuff. So let’s break it down and follow all stages it sends us to in order. This will
help in understanding the design of the firmware and give us the details we require to understand
all of the code.
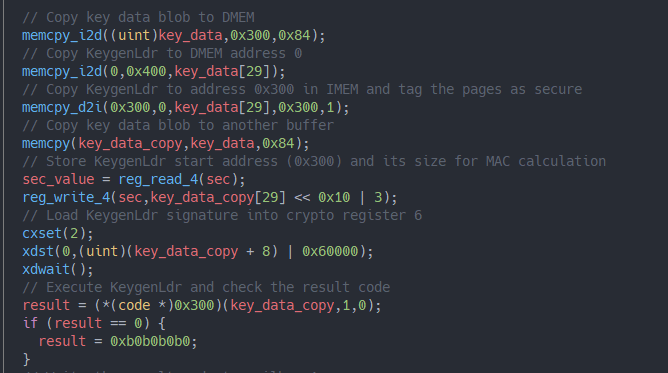
The method starts by copying the key data blob from address 0x300 in IMEM to a buffer in DMEM, we already know that behavior from Boot, and uses the information about KeygenLdr’s size to copy the blob to DMEM. But we can also go the other way round and copy data from DMEM to IMEM. This may seem like an unnecessary detour knowing that KeygenLdr was located in IMEM previously but this is in fact a necessary step. It lets the programmer control the virtual address from which a stage should be executed, and also tagging them as ‘secure’, which is the case here.
Then it loads the virtual start address and the size of KeygenLdr into the $sec SPR, transfers
the auth hash from the key data into crypto register 6 via the DMA override functionality for
crypto registers (cxset) and jumps to KeygenLdr passing a pointer to the key data copy and some
other arguments we cannot identify yet.
And this is where things are starting to get interesting: We’re about to leave No Secure mode and
transition to Heavy Secure mode execution of KeygenLdr by letting the hardware calculate a MAC
over the code region specified in $sec and comparing it to the auth hash we provided in crypto
register 6.
KeygenLdr#
Now in Heavy Secure mode, we’re running code that is officially signed with no possibility for us to manipulate it. The hardware also makes sure that execution starts at 0x300 so we can’t just jump to random places within the secure pages.
KeygenLdr starts by clearing interrupt bits, finishing pending DMA transfers, clearing all crypto
registers and validating stack boundaries so it can’t exceed the size of DMEM or drop below 0x800
to avoid the risk of a stack smash. This mitigates all influences we could have on the code from
No Secure mode execution before calling load_and_execute_keygen. This function on the other hand
calculates an AES-CMAC over the Boot blob and then decrypts, authenticates and executes Keygen. So
what’s actually happening there in detail?
maconstack#
The first couple of issues to talk about here begin with the CMAC check over the Boot code.
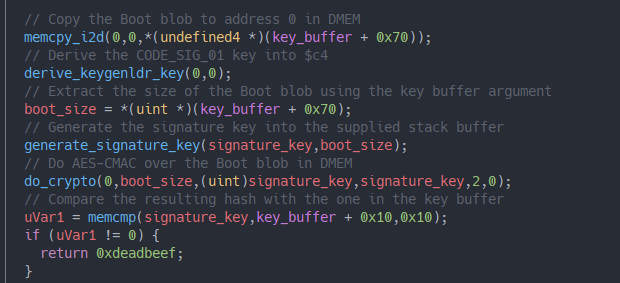
As you remember, Boot was that thing that would directly jump into SecureBootLdr which then launches KeygenLdr. This means that we cannot touch the Boot code but could still use our own SecureBootLdr to bring up this blob from an environment we control.
While the code of Keygen cannot be touched because the keys would change, KeygenLdr could technically be modified to verify both Boot and SecureBootLdr. This has however never been adressed because signatures are not revocable - an attacker could bring an old pair of vulnerable KeygenLdr/Keygen blobs and receive the same keys!
But there is an actual issue going on here - maconstack, initially discovered by
@hexkyz. The signature_key buffer where the final MAC is
copied to will be preserved in stack memory even after returning from the function which makes
it possible to abuse KeygenLdr as an oracle for generating auth hashes for arbitrary Boot code
and read them back via a DMEM dump after the firmware halted the processor. As a result, we can
run the TSEC firmware with a Boot blob controlled by us.
In addition to that, a timing vulnerability presents itself in the implementation of memcmp
which compares 32-bit words instead of bytes and bails on mismatch, which is still a feasible
realm for brute force, but more involved to pull off.
A builtin constant-time memcmp on crypto registers might have been appropriate here to prevent
accidental leakage of cryptographic secrets from their registers if not intended or strictly
necessary.
The Border between NS and HS#
When the MAC check succeeds, either by abusing maconstack or leaving the Boot stage as-is,
load_and_execute_keygen will continue to decrypt the Keygen stage in the next step as the
is_keygen_dec argument that was passed from SecureBootLdr is set to 0.
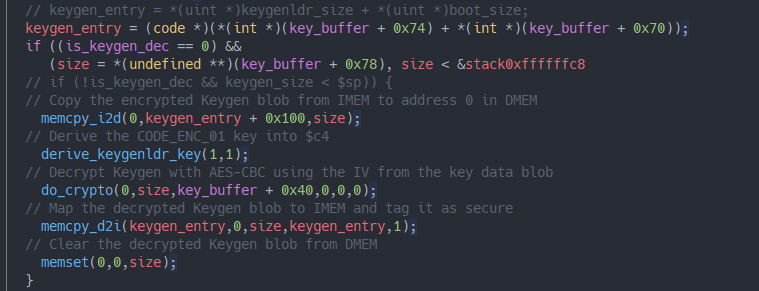
We know the pattern of re-mapping code pages as ‘secure’ already, but this time the encrypted Keygen blob in memory is first being decrypted with AES-CBC. Later, the blob gets cleared out from DMEM as we should obviously not be able to obtain its plaintext. The attentive reader might have noticed this already, but the sizes of each memcpy operation are directly taken out of the completely unverified key data table. This wouldn’t be a problem if stack guards were employed everywhere data is being copied, like for Keygen here.
But already at the very beginning of this method, where the Boot blob is copied for CMAC:
// Copy the Boot blob to address 0 in DMEM
memcpy_i2d(0,0,*(uint *)(key_buffer + 0x70));
the size is taken out of the key blob directly, leaving us with a possibility to craft a custom Boot blob that is capable of smashing the stack with the only restriction being that the stack pointer must stay above 0x800 when entering KeygenLdr!
Since this screams to be exploited, a lot of individuals have discovered this flaw independently
back then. Virtual memory makes it possible to preserve the same memory mappings, so we exploited
this flaw by setting the stack pointer to 0xA00 in a custom SecureBootLdr before jumping to
KeygenLdr. And when memcpy_i2d places its return address at 0x998, we can have the Boot blob
place the jump addresses for a ROP chain starting from there.
.size 0x998
.section #rop_payload 0x998

// mov $r10 0x1
// ret
.b32 0x5B8

// lbra #derive_keygenldr_key
.b32 0x647

...
This ROP chain can be made up into calling derive_keygenldr_key with the respective arguments to
generate both CODE_SIG_01 and CODE_ENC_01 keys with an ACL value of 0x13. These keys, similarly
to the CMAC, are readable from an insecure context and can be spilled from $c4 to DMEM by calling
crypto_load. But we should first read up on how these keys are even derived.
Key Derivation#
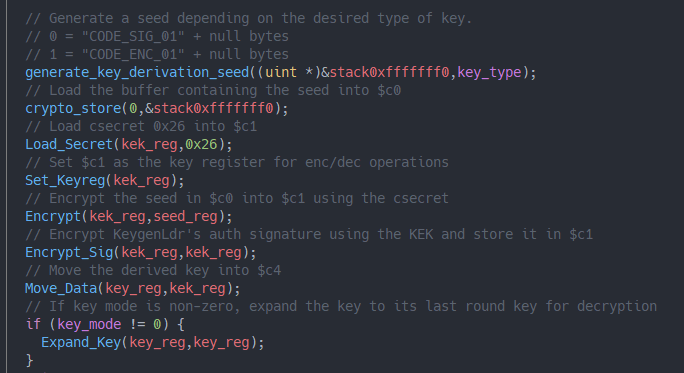
The function generates a seed into a buffer of 16 bytes. This buffer gets loaded into $c0 and
will be encrypted with csecret 0x26. This csecret has an Access Control List (ACL) value of 0x10,
meaning that we cannot read it out of a crypto register. The resulting ciphertext of that hash will
obtain the same ACL value so that we cannot obtain this KEK either. But the final step,
Encrypt_Sig or csigenc, encrypts the auth hash of KeygenLdr with that previously crafted KEK.
Additionally, key expansion may be done if the key is needed for decryption, but let’s focus on
that signature encryption mechanism here.
After Encrypt_Sig, the register containing the final key has an ACL value of 0x13, meaning that
it is considered insecure and can be read. The deal with this is that after encrypting the
signature with a KEK derived from hardware secrets, there’s no possibility to restore the original
KEK anymore from it. Other firmwares which would attempt to generate the same key, by deriving the
same KEK and providing the known auth hash manually for an Encrypt Operation would yet again end
up with an ACL 0x10 value and couldn’t read this key.
This is the Falcon’s mechanism to prevent insecure code from compromising the cryptosystem as a whole. But even then, a derived key may still be considered a secret by the firmware using it, so the responsibility of properly managing it is shifted to the programmer.
Implementing the Crypto Functionality#
From previous reversing of KeygenLdr, we know that a method do_crypto is responsible for actual
cryptographic operations with various arguments. It utilizes a key in $c4 that was previously
derived by derive_keygenldr_key. Now that we have the keys in question, we can model this
functionality in Python to have a more convenient way of messing with the system from our machine.
CODE_SIG_01 = unhexlify("<redacted>")
CODE_ENC_01 = unhexlify("<redacted>")

def sxor(x, y):
    return bytearray(a ^ b for a, b in zip(x, y))

def hswap(value):
    return (
        ((value & 0xFF) << 0x8 | (value & 0xFF00) >> 8) << 0x10
        | ((value & 0xFF0000) >> 0x10) << 0x8
        | value >> 0x18
    )

def generate_signature_key(size):
    buffer = bytearray(AES.block_size)
    buffer[0xC:] = hswap(size).to_bytes(4, "little")

    mode = 0x4  # AES-ECB encrypt
    return do_crypto(buffer, CODE_SIG_01, mode)

def sign_boot(boot: bytes):
    aes = AES.new(CODE_SIG_01, AES.MODE_ECB)

    cmac = generate_signature_key(len(boot))
    for i in range(0, len(boot), AES.block_size):
        cmac = aes.encrypt(sxor(boot[i:i + AES.block_size]), cmac)

    return cmac

def decrypt_keygen(keygen: bytes, iv: bytes):
    return AES.new(CODE_ENC_01, AES.MODE_CBC, iv).decrypt(keygen)
With that, we can sign our own Boot blob and also decrypt Keygen!
Executing Keygen#
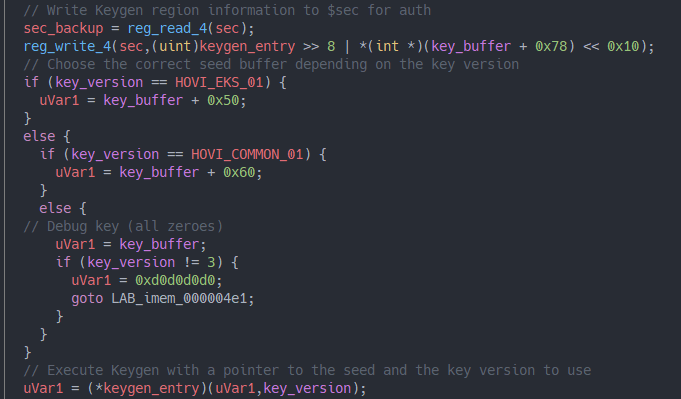
Like KeygenLdr, Keygen is executed with custom arguments. In this case, the first argument is a
pointer into the key data blob. Depending on our key version argument, it selects one of three
possible seeds from the key data blob. With version 1, passed by SecureBootLdr, the
HOVI_EKS_01 seed is chosen.
Keygen#
With all of the work we previously did, we can decrypt the Keygen stage with decrypt_keygen
from the script we wrote and start to analyze the resulting plaintext blob.
Upon jumping to keygen_main, the following code will execute:
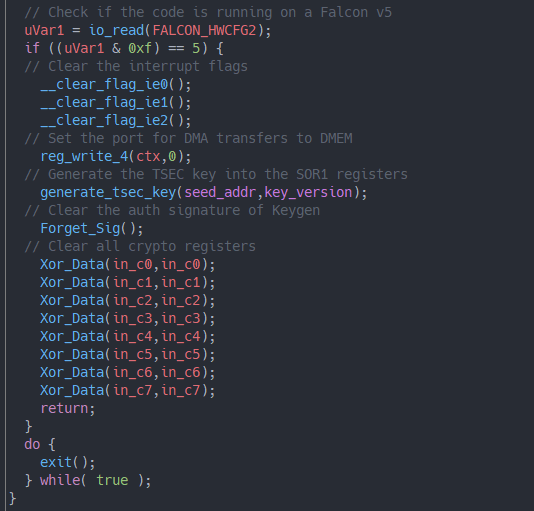
Again some interrupt handling, DMA configuration and final cleanup to avoid leaking state, but
by far not as many security measurements as there were in KeygenLdr. It calls generate_tsec_key
which derives and outputs the final TSEC key to SOR1 MMIOs. Let’s take a closer look at how
this works.
The Keygen in Keygen#
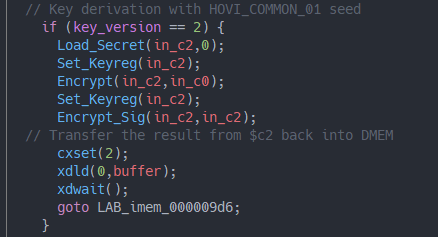
When the generate_tsec_key method executes, it loads the seed buffer argument into $c2,
then runs a keygen algorithm based on the key version and finally transfers the key back into
DMEM which then gets transferred to the SOR1 registers over DMA.
The algorithm for HOVI_COMMON_01:
The algorithm for HOVI_EKS_01:
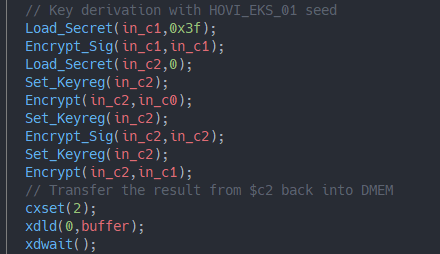
Having access to the key derivation algorithm for both seeds, this also explains their names. While the first algorithm uses exclusively csecret 0x00, which is equal across all TSEC engines, to derive its key, the latter additionally uses csecret 0x3f, the console-unique KFUSE private key.
Keygen, by design, writes the final key in either case to a place where we have access to. And from hax and investigation in KeygenLdr, we have its plaintext and know how to launch it correctly. So there’s no need to hack it, is it?
Investigating Heavy Secure Authentication: The BootROM#
While it is correct that there’s no need to hack Keygen if we just wanted the keys it produces. We
would just run it and read the result back, it’s as easy as that. But compared to KeygenLdr
something else that becomes interesting here. When comparing keygen_main with keygenldr_main,
one immediately notices how Keygen does not clear any crypto registers before executing
generate_tsec_key. So with some possibility to take control early enough, we could try to dump
some crypto registers which might have been used by the hardware signature verification mechanism.
To understand why this is important, one must know that the Falcon has a secure BootROM that serves as an exception handler to events NVIDIA refers to as “invalid instruction”. The name doesn’t really have anything to do with what it is actually about, but who needs good names when you’re a hardware engineer, right? And while this piece of code we don’t have access to does the auth, we can spy on it via some MMIOs that reveal the crypto command the Secure Co-Processor is executing. The algorithm can be reconstructed as:
csecret $c3 0x1
ckeyreg $c3
cenc $c3 $c7
ckeyreg $c3
cenc $c4 $c5
csigcmp $c4 $c6
A constant in $c7, in official microcode always set to zeroes, is encrypted with csecret 0x01
into $c3. Then something else in $c5 gets encrypted with that previously derived signing key
and this is being compared to our auth hash in $c6. But $c5 is still a mystery which needs
some possibility to dump crypto registers directly after authentication - that’s where Keygen
becomes relevant.
Big Boy ROP under Keygen#
ROP under Keygen is the new strategy. After analyzing where controllable input from the outside
is processed, we noticed how no collision check between $sp and the seed buffer is done.
Keygen trusts the environment KeygenLdr prepares for it.
While we cannot read the KFUSE private key, csecret 0x00 is obtainable due to insecure ACL bit.
And that means we can reproduce the entire keygen algorithm for HOVI_COMMON_01 on our machine.
That opens a very peculiar way for us to attack this:
We want to set the key buffer to overwrite the return address on the stack into something
favorable. The original return address of this function will be part of the plaintext as well.
So we will brute force a plaintext that contains the return address (0x929) as its first 32-bit
word and encrypts into a ciphertext that has the address of the ROP gadget as its first word:
CSECRET_00 = unhexlify("<redacted>")
KEYGEN_SIG = unhexlify("892A36228D49E0484D480CB0ACDA0234")
GENERATE_TSEC_KEY_RET = 0x929
FIRST_GADGET = 0x94D

def hovi_common_01_enc(seed):
    kek = AES.new(CSECRET_00, AES.MODE_ECB).encrypt(seed)  # Encrypt our seed with the csecret
    return AES.new(kek, AES.MODE_ECB).encrypt(KEYGEN_SIG)  # Encrypt the signature with the new KEK

# In practice, $sp and $pc only implement enough bits necessary to cover
# the IMEM and the DMEM of a Falcon engine. For the TSEC, that means 16 bits.
# All higher bits get truncated which simplifies the bruteforce by a lot.
u16 = lambda c: int.from_bytes(c[0:4], "little") & 0xFFFF

def prepare_plaintext():
    block = bytearray(get_random_bytes(AES.block_size))
    # Put the return address of generate_tsec_key as the first word.
    block[0:4] = GENERATE_TSEC_KEY_RET.to_bytes(4, "little")
    return block

while True:
    plaintext = prepare_plaintext()
    ciphertext = hovi_common_01_enc(plaintext)

    if u16(ciphertext) == FIRST_GADGET:
        print(f"Plaintext:  {hexlify(plaintext)}\nCiphertext: {hexlify(ciphertext)}\n")
Now we can use this to build a ROP chian under Keygen that is capable of dumping arbitrary crypto registers.
Using the newly gained possibilities, we can dump intermediary values from the Heavy Secure authentication to reimplement it via trial and error. The input parameters (code virtual address, the number of pages and the code itself) are known.
Faking the Signatures#
But not only does the previous work with enough commitment reveal that $c5 contains a Davies
Meyer MAC calculated over the code pages, it also reveals that the signing key which is used to
encrypt this MAC depends on a constant value in $c7 which can be controlled by us:
def calculate_davies_meyer_mac(data: bytes, address: int):
    ciphertext = bytearray(AES.block_size)

    for i in range(0, len(data), 0x100):
        blocks = data[i:i + 0x100] + pack("<IIII", address, 0, 0, 0)
        for k in range(0, len(blocks), AES.block_size):
            aes = AES.new(blocks[k:k + AES.block_size], AES.MODE_ECB)
            ciphertext = sxor(aes.encrypt(ciphertext), ciphertext)

        address += 0x100

    return ciphertext

# `key` is any `$c7` encrypted with csecret 0x1!
def generate_hs_auth_signature(key: bytes, data: bytes, address: int):
    assert len(data) % 0x100 == 0

    mac = calculate_davies_meyer_mac(data, address)
    return AES.new(key, AES.MODE_ECB).encrypt(mac)
Since csecret 0x1 is protected by ACL, we can’t just encrypt anything with it and be able to dump the ciphertext. That would be too easy.
Using our Keygen ROP to invoke csigenc with csecret 0x1 gives us something we can dump!
And since the Keygen signature is no secret, we can provide it to the hardware as $c7 and
essentially have the authentication algorithm use a signing key we can learn without having
to know the value of the csecret.
This allows us to “fake-sign” arbitrary code into Heavy Secure mode without relying on limited possibilities of ROP to get work done. We win.
Conclusions#
As fun as it was, the journey for now ends here.
We reversed a proprietary firmware with poor documentation and discussed a few vulnerabilities leading to the disclosure of firmware secrets due to missing validation of input data from outside in a high-security domain.
Multiple stages relying on each other with poor validation of the execution environment provides
a window to reverse the hardware authentication and lastly, we exploited a design flaw built
around the csigenc mechanism which allows us to fake-sign arbitrary code.
Throughout this article, we fully examined Boot, SecureBootLdr, KeygenLdr and Keygen. In the next part, the SecureBoot stage and its encrypted Falcon OS image will be discussed and analyzed. See you then!
Credits#
Credit where credit is due:
- @Thog for being my research partner and her patience in tirelessly listening to my late-night rants about this stuff
- @SciresM and @hexkyz for answering many of my stupid questions about certain crypto functionality